
React Native is the open source frame work created by Facebook to develop cross platform applications for Android, IOS, Web and Windows (UWP). Especially when it comes to mobile application development, applications developed using react-native can be released on both Android and IOS without needing to write code in Java and Swift separately. That is one codebase for different platforms. Using react native API, it is possible to access almost all native platform features like camera, microphone and location etc
React Native is acts like a bridge which translates the typical javascript/HTML/CSS into native code. Which makes it different from other frameworks that use webview
Setting up React Native Development Environment for Android
To get started with development following tools are required
- NodeJS
- Java JDK
- Android Studio
- React, React-dom, React-Router
- React-Native
- React Dev Tools
- Watchman (Optional)
- VisualStudio Code
Install latest stable Node.js which is JavaScript runtime for server side programming from install node.js
Install Node and Watchman
Install Node and Watchman on MacOS
brew install node
brew install watchman
Android Development Environment
Android development environment is required for react-native development. If you are new to android environment follow steps mentioned as mentioned below
- Install Android Studio
- Install Android SDK
- Configure the environment variable ANDROID_HOME
- Add android platform-tools to path environment variable
Install JDK for Android development and Install Android Studio which comes with Andriod SDK and also provides emulator for testing
Install React Native CLI
npm install -g react-native-cliCreate react native project using react-native command
react-native init HelloReact or
npx react-native init HelloReactIf it is first time, and depends on bandwidth it might take a little while

Once react project and it’s directory structure is created by “react-native init” command. You will see two folders “android” and “ios” inside project directory where these are for platforms android and ios respectively
File structure of react native project is as follows
.
├── App.js
├── Gemfile
├── Gemfile.lock
├── __tests__
│   └── App-test.js
├── android
│   ├── app
│   ├── build.gradle
│   ├── gradle
│   ├── gradle.properties
│   ├── gradlew
│   ├── gradlew.bat
│   └── settings.gradle
├── app.json
├── babel.config.js
├── index.js
├── ios
│   ├── HelloReact
│   ├── HelloReact.xcodeproj
│   ├── HelloReactTests
│   ├── Podfile
│   ├── Pods
│   └── build
├── metro.config.js
├── package-lock.json
├── node_modules
└── package.json
assets: images, vectors, fonts, etc.
src: Source Code.
components: Definition of Components
constants: Constants
routes: navigators.
redux: State management/reducers and store
views: application screens/features.
helper: helpers.
utils: Utility functions
App.js: Main component that starts app.
index.js: Entry point of your application.
Where, starting point of the application is “index.js”
Run React Application
React application be run on selected device or emulator. Assuming you have configured and selected appropriate device using Android Device Manager (ADB)
First Start the Metro Bundler which return single JavaScript file that is composed by taking entry file and various options and all of code along with dependencies
# to start Metro Bundler

npx react-native start
Get another standalone terminal and run the following command to start application
As shown in instructions given after running “react-native”. Run the application using following command
npx react-native run-android

#or
npm run android
Run following to start application for ios
npx react-native run-ios

#or
npm run ios
For the sake of this tutorial we are using Windows and Android. If android SDK installed and configured properly, after running “npx react-native run-android” you must be able see emulator opened as follows
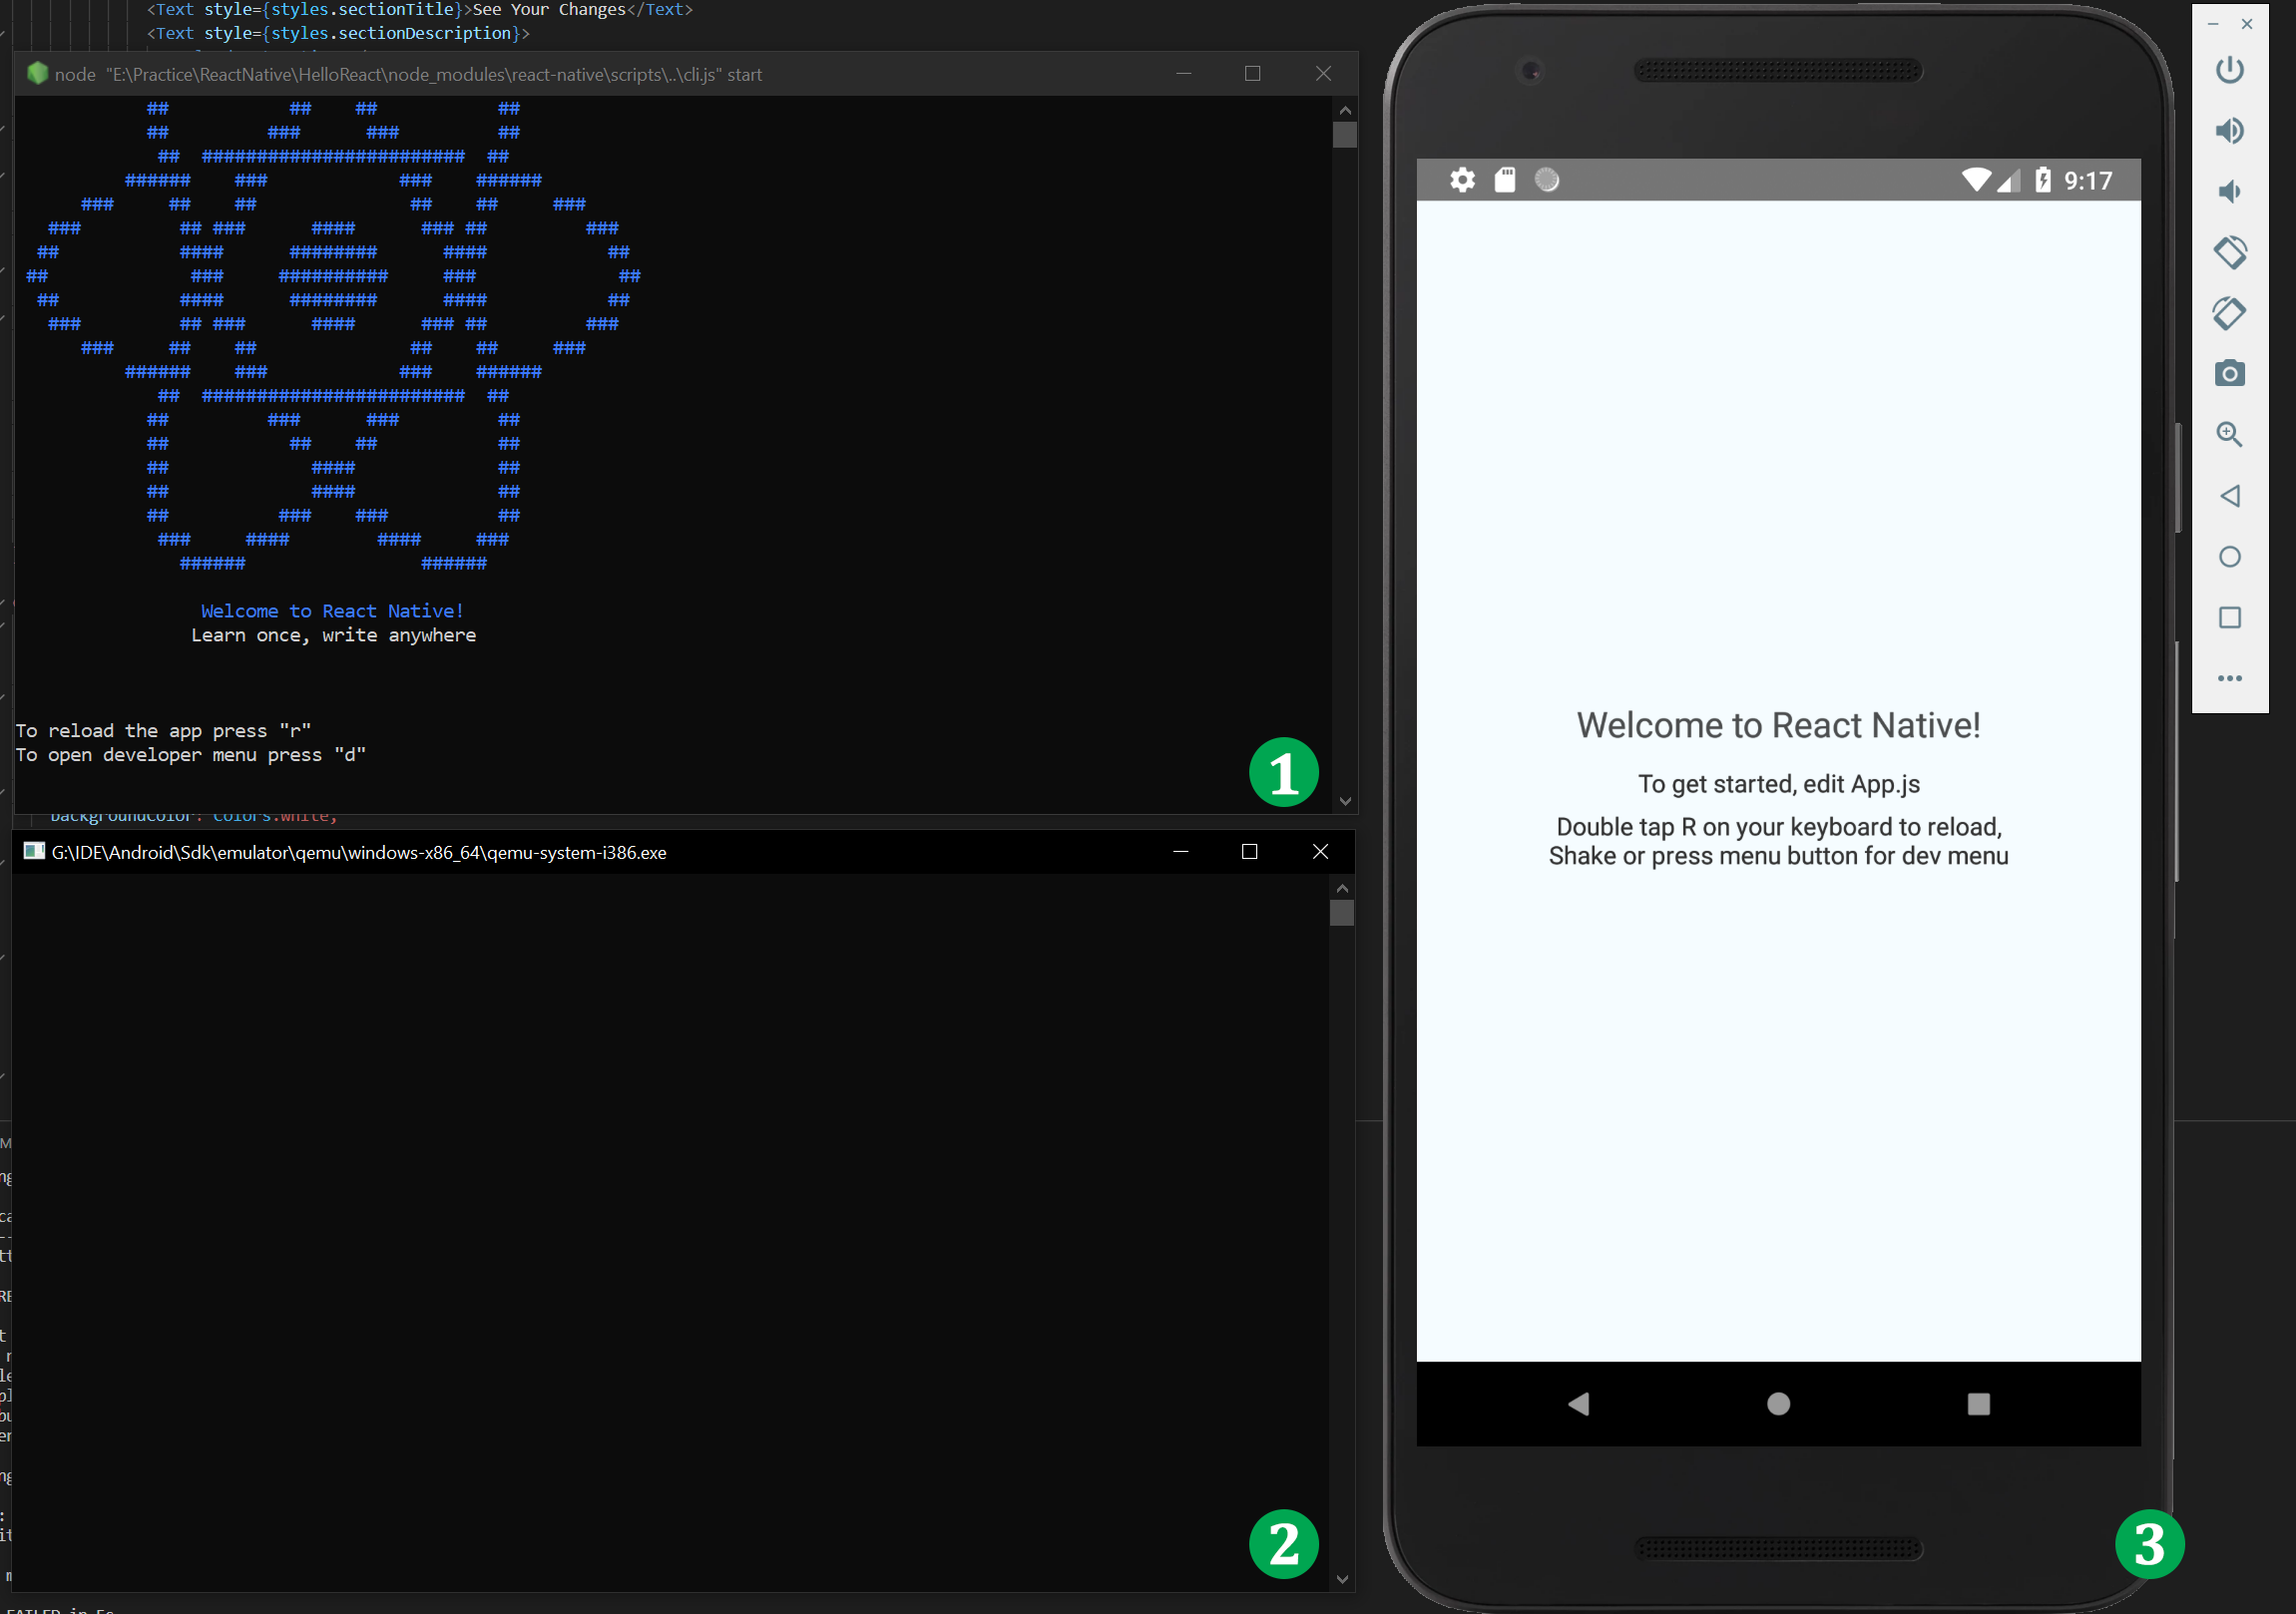
First windows is react-native cli prompt, second windows is emulator command that opens the android emulator which is window 3
Double tab R for reload and press CTRL/CMD + M to open react-native debug menu
React-devtools is the essential component required to debug and troubleshoot while coding
Install react-devtools
React DevTools is available as an extension for Chrome and Firefox but installing react-devtools enables you debug application debug react native application in mobile browser
Install react-devtools
# Yarn
yarn global add react-devtools

# NPM
npm install -g react-devtools
While react application is running in a device or emulator run the following command to debug using stand-alone react-devtools
react-devtools Using react-devtools we can see react DOM, props and state of components
Bonus Tip: Expo GO
For new comers to get started using Expo Go would be nice choice. Where using Expo Go is optional which is a complimentary tool that assists your development. Expo is a set of tools and service built around React Native. You can try React Native with out installing, in browser it self here at: https://snack.expo.dev/.
To run the react-native app on IOS or Android, install the Expo Go app mobile device and scan the QR code
Troubleshooting Running React App
If you see the error asking to accept licenses
error Failed to install the app. Please accept all necessary Android SDK licenses using Android SDK Manager: "$ANDROID_HOME/tools/bin/sdkmanager --licenses". Run CLI with --verbose flag for more details.
Error: Command failed: gradlew.bat app:installDebug -PreactNativeDevServerPort=8081
You need to accept licences just in case not accepted before. Run following command
$ANDROID_HOME/tools/bin/sdkmanager --licensesOn windows, run following command
%ANDROID_HOME%/tools/bin/sdkmanager --licensesIf above command haven’t worked, Open Android Studio then go to Tools > SDK Manager > Select SDK Tools > Install Google Play Licensing Library
2. Check, Did you create and configure device emulator properly ?
3. Still, if you are bumping into problems, try
npm start -- --reset-cache 4. ANDROID_SDK_ROOT. Environment variable
Error: Failed to install the app. Make sure you have the Android development environment set up:
React Native tools environment ANDROID_SDK_ROOT to build and run apps with native code
Add following code into $HOME/.bash_profile or $HOME/.bashrc at the end of the file. if you are using zsh then ~/.zprofile or ~/.zshrc. To figure out which shell you are using, run the command “echo $SHELL”
export ANDROID_SDK_ROOT=$HOME/Library/Android/sdk
export PATH=$PATH:$ANDROID_SDK_ROOT/emulator
export PATH=$PATH:$ANDROID_SDK_ROOT/platform-tools
Did you encounter?
TypeError: cli.init is not a function . When running react-native init ?
In such a case error is from new version. You would have to specify the version as follows
npx react-native init HelloReact --version 0.68.2Where, HelloReact is the project name
__
Error: Command failed: ./gradlew app:installDebug -PreactNativeDevServerPort=8081
Runtime Error on Mac
RuntimeError: abort(Error: Failed to install CocoaPods dependencies for iOS project, which is required by this template.
How to install node and watchman on MacOS?
brew install node
brew install watchman

Leave a Reply